React Multiple Select – Metronic Theme and React Hooks

This article introduces the React Multiple Select using React Hooks.

I have vendors in various cities who are providing service to their customers. The situation is I need to assign societies to vendors as per their preference. A vendor may provide service to multiple societies in an area.

For this, I used Metronic theme and React hooks – useEffect.

There is a list of vendors and now I want to assign societies to a particular vendor.

To do so I redirected to details of the vendor.

First, select a city, then an area and then I want a filtered list of societies from that area of the city.


React Multiple Select - Metronic Theme and React Hooks

Step 1 :
Fetched a list of cities using async-await with useEffect hook.

/* Get list of all Cities */

const apiUrl = API_ENDPOINT + “city_list/”;

useEffect(() => {

const fetchData = async () => {

const result = await axios(apiUrl).then(response => response.data)

.then((data) => {

setData(data.data);

let count = Object.keys(data.data).length;

setcount(count);

})

};

fetchData();

}, []);

/* End Get list of all Cities */


Step 2 :

Fetched a list of areas from the selected city using async-await with useEffect as —>

/* Get area list by City */

const apiUrlArea = API_ENDPOINT + “area_list/”;

useEffect(() => {

let postAreaData=”;

if(formdata.city_id && formdata.city_id !==”){

postAreaData = {city_id:formdata.city_id}

const fetchData = async () => {

const result = await axios.post(apiUrlArea,postAreaData).then(response => response.data)

.then((data) => {

setareadata(data.data);

})

};

fetchData();

}

},[formdata.city_id]);

/* End Get area list by City */


Here formdata contains details of the vendor to edit.


This code will get executed as we change City and we are able to get a list of all areas from the selected city.


Step 3 :

Now I have a city and area , I can get a list of all societies in that area.

/* Get Societies by City & Area */

const apiUrlGetSociety = API_ENDPOINT + “society_list”;

useEffect(() => {

let postCityAreaData = {

area_id:formdata.area_id,

city_id:formdata.city_id,

}

const temp_slist = [];

if(formdata.area_id && formdata.area_id!== ” && formdata.city_id && formdata.city_id!== ” ){

const fetchData = async () => {

const result = await axios.post(apiUrlGetSociety,postCityAreaData).then(response => response.data)

.then((data) => {

data.data.forEach(element => {

const obj_temp = {‘id’:element.id, ‘name’:element.name};

temp_slist.push(obj_temp);

});


setAllSocieties(temp_slist);

setShowLoading(false);

console.log(“allSocieties”);

console.log(temp_slist);


})

};

fetchData();


}

},[formdata.area_id,formdata.city_id]);

/* End Get Societies of Area */


Here I get a list of societies as an array of object – {id,name}


let  allSocieties = [ {“id”: 6,”name”: “Abhiruchi”}, {“id”: 2,”name”: “Sahara Society”}, {“id”: 3,”name”: “Satyam Society”},]

Now we have a filtered list of societies with respect to the area from the city.

Step 4 :

To show listing on form I used form-components from Metronics.

( https://keenthemes.com/metronic/preview/react/demo2/google-material/inputs/selects )


The Select component can handle multiple selections. It’s enabled with multiple property.

<FormControl className='form-control'>

<Select

multiple

name = “societies”

id = “societies”

value = { selectedSocieties }

onChange = { handleChange_multiple }

input = { <Input id=”select-multiple-chip” /> }

renderValue = { selected => (

<div className = {classes.chips}>

{ selected.map( s => {

const chipname = allSocieties.find(soc => soc.id === s);

return (chipname

?   <Chip

key={s}

label={chipname.name}

className={classes.chip}

data-aaa={JSON.stringify(allSocieties)}

/>

: ”)

})}

</div>

)}

MenuProps={MenuProps}

>

{ allSocieties.map((itemsociety) => (

<MenuItem

key={itemsociety.id}

value={itemsociety}

>

<Checkbox checked={selectedSocieties.includes(itemsociety.id) } />

<ListItemText primary={itemsociety.name} />

</MenuItem>

))}

</Select>

</FormControl>


In the above select component, we have passed selectedSocieties to value attribute.
selectedSocieties is an array of ids of societies which are already assigned to vendor.
I can get list of assigned societies to vendor as –>


useEffect(() => {

setShowLoading(true)

setformdata(props.data)

if(props.data.vendorSociety && props.data.vendorSociety !== ” && props.data.vendorSociety !== ‘undefined’ ){

props.data.vendorSociety.forEach(el => {

const obj = {‘id’:el.id, ‘name’:el.name};

temp_selected_slist.push(el.id);

})

setSelectedSocieties(temp_selected_slist);


}

}, [props.data]);

react multiple selection

After selecting one/more societies, handleChange_multiple event bind selected societies data to selectedSocieties . See the following code:


const handleChange_multiple = event =>{


let newitems = event.target.value.filter(t => typeof t !== ‘number’);

let changed = newitems[0].id;

let cleanthis = event.target.value.filter(t => typeof t === ‘number’);

newitems.forEach(i => cleanthis.push(i.id));

const newSelectedItems = selectedSocieties.includes(changed)

? selectedSocieties.filter(v => v !== changed)

: […selectedSocieties, changed];

setSelectedSocieties(newSelectedItems);


}


In the example given in Metronic , handleChange event deals with an array of the name only. In above we are dealing with an array of objects.
In the above code, in handleChange_multiple event, we get newly selected items as an object – newitems {id,name}. Then extract id from it and saved to changed. 

Now I can check with changed whether it exist in  selectedSocieties.


const newSelectedItems = selectedSocieties.includes(changed)

? selectedSocieties.filter(v => v !== changed)

: […selectedSocieties, changed];

setSelectedSocieties(newSelectedItems);


In above article , we learned how to use multiple select in combination with array of objects and obtain required results.



React JS Environment Setup and Component Creation

This article introduces the environment setup and how to create React component.

Overview of React JS

React is a JavaScript library for building interactive User Interfaces (UI’s) & it’s developed by Facebook in 2011. It follows the component-based approach which helps in building complex and reusable UI components.

Environment Setup
Tools required for ReactJS environment
1. Node.js
2. Visual Studio Code(Editor) / you can use any editor

Steps to Setup ReactJS Environment

To run the React application, NodeJS should be installed on our PC.
Then follow the below steps:

Step 1: Install NodeJS. You need to visit the official download link of NodeJS to download and install the latest version. Once we have set up NodeJS on our PC, the next thing we need to do is to set up React Boilerplate.

Step 2: Create a directory for React.js App:
using command –
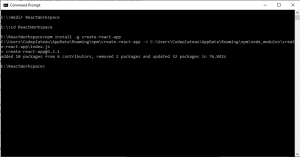
mkdir ReactWorkspace

picture1

Step 3: Go to newly created ReactWorkspace directory location using command – see screenshot:

cd ReactWorkspace

Step 4: Setting up React Boilerplate.

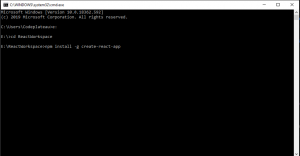
We will install the boilerplate globally.

npm install –g create-react-app

Create a React Boilerplate using the above command – see screenshot.

-g represents the global installation type.

Step 5: After successfully installing a global react environment. Create react demo app using the following command:

create-react-app demoapp

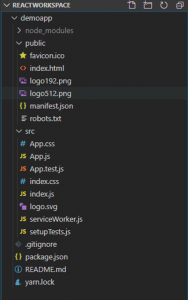
The above statement will create a new directory named demoapp inside your current directory with a bunch of files needed to successfully run a React app.

Let’s have the look at the directory created by the above command:

In the following directory, you will see a number of files. The main files we will be working on within the basic course are index.html and index.js. The index.html file will have a div element with id = “root”, inside which everything will be rendered and all of our React code will be inside the index.js file.

Now, that we have successfully set up the development environment for React Js.

The last thing is to start the development server.


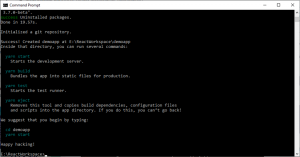
Step 6: To start the development server, go inside your current directory “demoapp” and execute the below command:

npm start

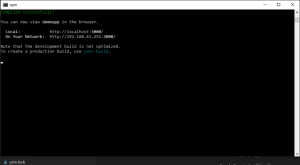
After successfully running the above command your compiler will show the below message on your screen:

And after starting our first React application, we will see the default screen on the browser.

Component creation in React Js:


            Components are the reusable peace of code for building blocks of any React application. It’s like JavaScript functions. They accept arbitrary inputs (called “props”) and return React elements describing what should display on the screen.

We have seen the default structure of the ReactJS application in step 5 second screenshot.

Create a new component file in /src folder-
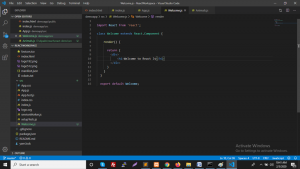
I have created Welcome.js and add component code in that file-


import React from 'react';
class Welcome extends React.Component {
render() {
return (

Welcome to React Js

)
}
}
export default Welcome;

see the following screenshot:

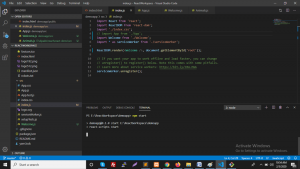
And we need to add our newly created Welcome.js file into index.js to see it on the browser screen:

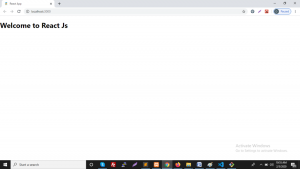
Now we can see the output on browser screen:

In the above article, we learned how to setup React JS Environment and create simple components.

Process of Understanding and Adapting to React Js

When I got to know that our company will be focusing on new technologies, I was excited and nervous at the same time. JavaScript is the language that is currently trending, so it was an obvious preference. We were using JavaScript but only in limited projects that are making the pages dynamic. There are many frameworks built-in JavaScript for both frontend and backend. Initially, it was finalized API will be built in Nodejs as it is widely used and very easy to understand and as it is widely used it is easy to develop and debug code. I found some useful tutorials for Express Js (Node Js framework) and it felt very easy to understand as we had experience in Laravel Framework (PHP framework). API for me was a straightforward task but the real fun began when we started with the frontend part. Initially, it was finalized to go with AngularJs (framework) as it is a widely used JavaScript framework but it was not straightforward to understand and many people had issues adapting the angular Js. And then we were introduced to React Js (we got tutorials from an expert as well).

So, after working on React Js for the last 4 months, I will put forward the blockers we had and also the interesting bits of React Js. many people confuse it as an Alternative framework to AngularJs but it is not. It is an open-source Library created and managed by Facebook. React Js can be integrated with any framework as it is the V of MVC that is, it just renders the code in the browser with the help of JSX. So, let’s start with the Advantage we felt of the React Js.

1) Easy to Use

Documentation is the key to any framework/library and the documentation for reacting is maintained very well and it’s easy to understand and move forward with. There are also many courses and tutorials available online which helps further.

2) Reusable Components

Components are used for managing the Html code which will be further rendered in the browser. A component has its own set of control and logic. Components can be nested with each other that further helps for reusability.

3) Virtual Dom

React Js uses a virtual DOM-based mechanism to fill data in HTML DOM. The virtual DOM works fast as it only changes individual DOM elements instead of reloading complete DOM every time

4) Benefit of JavaScript Library

React Js is used by most of the Developers thanks to its flexible nature, there are no specific parameters. Developers get a free license to manage the code as per their feasibility

Now every coin has two sides and React Js is no different. Adapting to React Js was not a tricky task but there were some blockers that we can consider as a disadvantage. The following are the Disadvantages listed below.

1) JSX is a barrier

React Js uses JSX which has a syntax similar to Html, but therein lies the problem. Any developer who has used Html finds it hard to adapt to the JSX due to its complexity.

2) V of MVC

React Js cannot be used as a stand-alone platform as it is wholly dependent on the other technology to manage the data. They are only the UI layers of the app and nothing else.

3) Hard to Adapt the Pace of its Development

React Js introduced hooks which help in reducing code Complexity and Reusability but for a newbie, it becomes hard to debug the code as all the previous code is not built around hooks. So in general developers have to always adapt to the changes being done in the library.

4) Documentation can be Maintained Better

As I mentioned above React Js is a very rapidly growing library but if we look at the documentation it does not provide adequate information on the new things introduced and the developers are left with trial and error for adapting to new things.

5) Not SEO Friendly

There are tools available to Render our Meta tags on the page but unfortunately, Facebook does not crawl through them and we are left with managing the Tags with some other Platform for the Particular Page.

Overall if we consider, React Js is the Present and the Future of JavaScript web development. It has its sets of Pros and Cons but to be honest it makes the process of Dynamic web development fun and easy thanks to its flexibility.

What are React Hooks?

React Hooks were introduced at React Conf October 2018, where two major functional
components were highlighted – useState and useEffect. Function compontents were initially known as functional stateless components (FSC), where they are finally able to
useState with React Hooks. Therefore, many people refer them as function
components.

Hooks let you “hook into” the underlying lifecycle and state changes of a component
within a functional component. More than that, they often also improve readability and
organization of your components. We can check 2 hooks that are used regularly while
using React Js.

1) useState:
import React from 'react';
function App() {
return (
<div>
<h1>0</h1>
<button>Change!</button>
</div>
);
}

In this above example, this is a simple functional component in which we can import our
first hooks useState for Handel state data.

import React, { useState } from 'react';
function App() {
const value = useState();
console.log(value);
return (
<div>
<h1>0</h1>
<button>Change!</button>
</div>
);}

If we run this code and console the data then we can get a response as below
> [null, ƒ()]
And if we add an argument into use state
const value = useState(true);
we can get a response as below
> [true, ƒ()]
Now we can access state value and render it in <h1> in our component such as


import React, { useState } from 'react';
function App() {
const value = useState(0);
console.log(value); // [0, ƒ()]
return (
<div>
<h1>{value[0]}</h1>
<button>Change!</button>
</div>
);
}

There are 2 types of functionality that store data into use state

1) Object destructuring
2) Array destructuring

Array destructing is almost the same, but uses square brackets [ ] instead of curly
braces { }.
Using array destructuring, we can get the initial value of state from the useState() hook.

import React, { useState } from 'react';
function App() {
// remember, there's a second item from the array that's missing here, but we'll come
right back to use it soon
const [count] = useState(0);
return (
<div>
<h1>{count}</h1>
<button>Change!</button>
</div>
);
}

Right now we can get initial state value but how we can change the value in hooks that
are described in the below example


function App() {
const [count, setCount] = useState(0);
function change() {
setCount(prevCount => prevCount + 1);
}
return (
<div>
<h1>{count}</h1>
<button onClick={change}>Change!</button>
</div>
);
}

Here we first set initial count to use state is 0 then for an update that
counts we can use onclick event listener on button click.
Remember that useState() hook returns an array with 2 members. The second
member is a function that updates the state!

2)useEffect

In class-based components, we needed to know the basics of lifecycle methods and which
method is perfect for different situations. useEffect hook simplified this situation. If you wish to
perform side effects, network request, manual DOM manipulation, event listeners or timeouts
and intervals.
useEffect hook can be imported just like useState.

import React, { useState, useEffect } from 'react';

To make useEffect work, we pass it an anonymous function as an argument. Whenever React
re-renders this component, it will run the function we pass to useEffect

useEffect will run every time the component re-renders, and the component will re-render every
time the state is changed.
So if we write the following code, it will get us stuck in an infinite loop! This is a very common
gotcha with useEffect

If you want to call useEffect on some call function that also possible in react hooks.